Later, I searched on the net and found few good sites, youtube videos and tailoring books to get me started. After a lot of trial and error I have managed to learn a good deal. nd this time I have tried to make a ¾ pant with an attached skirt. This is the easiest, ideal for all those who are in the learning stage. I have given the maximum information, but if there is any question still unanswered, ask and will try to answer. After all, I have got so much from this online medium, its just fair enough that I give back something now.

Measurements (in Inches)
First fold the material twice first lengthwise then widthwise. Mark the measurements as per your requirements.
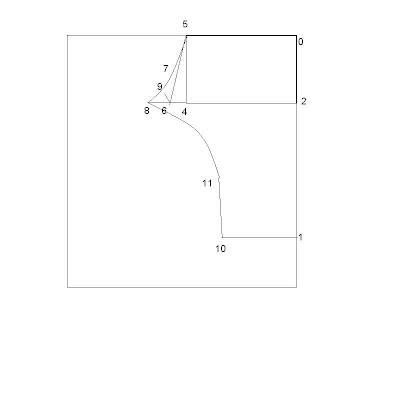
0-1 : Length +1 ½”
0-2 : From waist to seat
0-5 : 1/4 of waist +1/4”
2-4 : same as 0-5
Make a square joining 0-2-4-5
4-6 : 1”
Join 6 and 5
6-7 : 1/6 of seat
6-8 : 1/12 if seat less ½ “
6-9: ½ of 6-8
Make a curve joining 8-9-7
1-10 : ½ of bottom
10-11 bottom to knee length
Finally make a curve joining 10-11-8
Now cut from 1-10-11-8-7-5.
From the remaining piece of the material cut (2) 1 1/2'” width and waist length strips for the waistband. And 4 pieces of strips of about 5” long and 1” wide for the bottom of legs.
Instructions:
Start with the bottom of the leg, fold them in about 1/4'” and stitch. Always stitch such rough edges to give a nice finishing. Once both the legs’ bottom has been stitched, start stitching from point 10 to 8 on both the legs separately. This stitches are done on the wrong side of the material put the right side out after stitching from point 10 – 8 and bring together the inside middle seam and stitch them this will join both the legs.
This completes the basic stitching of the pant. Take the waist band cloth, properly stitch its rough edges and stitch each waist band to each side of the pant. Before that, stitch the rough edges of the waist area of the pant. While you can join one of the waist band keep one of it open to insert an elastic or drawstrings.
4 strips that we had cut earlier, we will give them a good arrow shape and stitch it on the wrong side of the pant about 1” above the bottom area. Take its other end on the right side of the pant’s bottom and sew a button on it. The ¾ pant is now ready, you can stop it here if you so wish. However, I have done something more to the pant.
Take some more cloth from the unused material. The length of the material will be as long as to cover the pant and the width can be about 10”. After stitching all the rough edges of the cloth, stitch it on the waist area of the pant or a little above the waist area. You can finish it with a button on the end of this cloth and a button hole on the other end of the cloth.
Your ¾ pant with skirt attached is done.
To understand better check this video;
 Tweet this
No comments:
Post a Comment