Ingredients used
1. Crabs – 7
2. Grated coconut – 2 cups
3. Small Red chillies – 6
4. Long Red Chillies – 4
5. Coriander seeds – 1 tablespoon heapful
6. Cumin seeds – 1 teaspoon
7. Black pepper – ½ teaspoon
8. Fenugreek seeds – ½ teaspoon
9. Garlic – 6/7 Cloves
10. Ginger - ¾ inch
11. Onion – 1 Medium size
12. Turmeric ½ teaspoon
13. One small raw mango (You can also use tamarind 2 inch)
14. Salt as per taste
Method
Grind together item 2 – 12, use only half onion.
In a vessel add about 1/2 cup water and raw mango, let it boil for 10/15 mins in medium heat. To this add the ground masala and water as required (for thick gravy less water) followed by the remaining half onion, finely cut. Now add salt as per taste.
Let this first boil in high flame for 5 mins and then reduce the flame to minimum and boil for 5 mins.
Finally add the crabs, properly cleaned and cut. The crabs with gravy needs to be boiled in high flame for 5 mins and the slow heat for about 20/25 mins.
April 23, 2009
March 21, 2009
How to cut and stitch a 3/4 pant
Even as a teenager, I wished I could stitch my own clothes. It was never so easy because no one in my family knew tailoring and moreover I was never encouraged with my desire to learn tailoring. Last year I joined a tailoring class however, I was not too happy with the way they taught, hardly understood why I am doing what I am asked to do. So I quit soon after.
Later, I searched on the net and found few good sites, youtube videos and tailoring books to get me started. After a lot of trial and error I have managed to learn a good deal. nd this time I have tried to make a ¾ pant with an attached skirt. This is the easiest, ideal for all those who are in the learning stage. I have given the maximum information, but if there is any question still unanswered, ask and will try to answer. After all, I have got so much from this online medium, its just fair enough that I give back something now.

Measurements (in Inches)
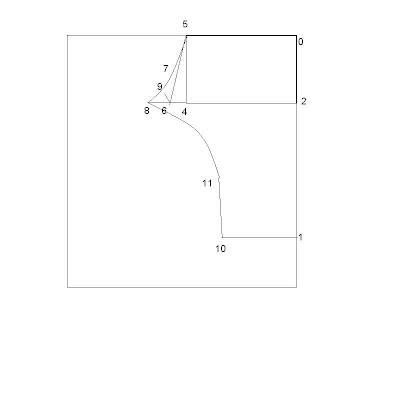
First fold the material twice first lengthwise then widthwise. Mark the measurements as per your requirements.
0-1 : Length +1 ½”
0-2 : From waist to seat
0-5 : 1/4 of waist +1/4”
2-4 : same as 0-5
Make a square joining 0-2-4-5
4-6 : 1”
Join 6 and 5
6-7 : 1/6 of seat
6-8 : 1/12 if seat less ½ “
6-9: ½ of 6-8
Make a curve joining 8-9-7
1-10 : ½ of bottom
10-11 bottom to knee length
Finally make a curve joining 10-11-8
Now cut from 1-10-11-8-7-5.
From the remaining piece of the material cut (2) 1 1/2'” width and waist length strips for the waistband. And 4 pieces of strips of about 5” long and 1” wide for the bottom of legs.
Instructions:
Start with the bottom of the leg, fold them in about 1/4'” and stitch. Always stitch such rough edges to give a nice finishing. Once both the legs’ bottom has been stitched, start stitching from point 10 to 8 on both the legs separately. This stitches are done on the wrong side of the material put the right side out after stitching from point 10 – 8 and bring together the inside middle seam and stitch them this will join both the legs.
This completes the basic stitching of the pant. Take the waist band cloth, properly stitch its rough edges and stitch each waist band to each side of the pant. Before that, stitch the rough edges of the waist area of the pant. While you can join one of the waist band keep one of it open to insert an elastic or drawstrings.
4 strips that we had cut earlier, we will give them a good arrow shape and stitch it on the wrong side of the pant about 1” above the bottom area. Take its other end on the right side of the pant’s bottom and sew a button on it. The ¾ pant is now ready, you can stop it here if you so wish. However, I have done something more to the pant.
Take some more cloth from the unused material. The length of the material will be as long as to cover the pant and the width can be about 10”. After stitching all the rough edges of the cloth, stitch it on the waist area of the pant or a little above the waist area. You can finish it with a button on the end of this cloth and a button hole on the other end of the cloth.
Your ¾ pant with skirt attached is done.
To understand better check this video;
Later, I searched on the net and found few good sites, youtube videos and tailoring books to get me started. After a lot of trial and error I have managed to learn a good deal. nd this time I have tried to make a ¾ pant with an attached skirt. This is the easiest, ideal for all those who are in the learning stage. I have given the maximum information, but if there is any question still unanswered, ask and will try to answer. After all, I have got so much from this online medium, its just fair enough that I give back something now.

Measurements (in Inches)
First fold the material twice first lengthwise then widthwise. Mark the measurements as per your requirements.
0-1 : Length +1 ½”
0-2 : From waist to seat
0-5 : 1/4 of waist +1/4”
2-4 : same as 0-5
Make a square joining 0-2-4-5
4-6 : 1”
Join 6 and 5
6-7 : 1/6 of seat
6-8 : 1/12 if seat less ½ “
6-9: ½ of 6-8
Make a curve joining 8-9-7
1-10 : ½ of bottom
10-11 bottom to knee length
Finally make a curve joining 10-11-8
Now cut from 1-10-11-8-7-5.
From the remaining piece of the material cut (2) 1 1/2'” width and waist length strips for the waistband. And 4 pieces of strips of about 5” long and 1” wide for the bottom of legs.
Instructions:
Start with the bottom of the leg, fold them in about 1/4'” and stitch. Always stitch such rough edges to give a nice finishing. Once both the legs’ bottom has been stitched, start stitching from point 10 to 8 on both the legs separately. This stitches are done on the wrong side of the material put the right side out after stitching from point 10 – 8 and bring together the inside middle seam and stitch them this will join both the legs.
This completes the basic stitching of the pant. Take the waist band cloth, properly stitch its rough edges and stitch each waist band to each side of the pant. Before that, stitch the rough edges of the waist area of the pant. While you can join one of the waist band keep one of it open to insert an elastic or drawstrings.
4 strips that we had cut earlier, we will give them a good arrow shape and stitch it on the wrong side of the pant about 1” above the bottom area. Take its other end on the right side of the pant’s bottom and sew a button on it. The ¾ pant is now ready, you can stop it here if you so wish. However, I have done something more to the pant.
Take some more cloth from the unused material. The length of the material will be as long as to cover the pant and the width can be about 10”. After stitching all the rough edges of the cloth, stitch it on the waist area of the pant or a little above the waist area. You can finish it with a button on the end of this cloth and a button hole on the other end of the cloth.
Your ¾ pant with skirt attached is done.
To understand better check this video;
March 1, 2009
Blogging, the new age hobby...
Blogging has grown in the recent years so much that for many it’s become the choicest hobby. So it would not be wrong to say Blogging is the new age hobby. The percentage of educated people who love to write is huge and so for every net savvy person blogging is a passion. What does it take to start a blog? A blogger account and lots of topics to write upon, and there begins your new hobby.
Blogging is fun however, make sure what exactly you are trying to achieve by blogging or you may end up disinterested. There are people who blog because of one of the following reasons;
Because their friends are blogging...
Because they have something to say...
Because they want to gain attention...
If you want to have a successful blog, first think about a niche you want to write on, and once that’s decided, regularly update you website with useful content. Doing this there is nothing to stop you from getting the title of a successful Blogger. If you are thinking what you can write about... simple, what you like the most. Fashion, current affairs (be careful while writing about current affairs don't take any names because there are hypersensitive journalists who may sue you for writing your opinion, plus now there are some laws for blogging that may sound scary), technology, sports etc.
You will be surprised how, while blogging you will learn so much yourself about something that interests you.
February 4, 2009
Wedding cards used to make a old file look new
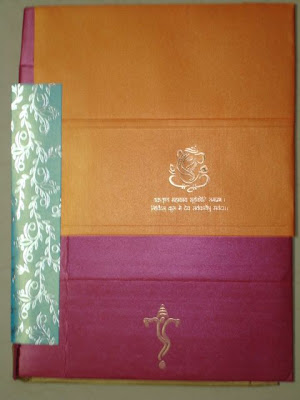
It was always difficult for me to throw away such good wedding cards. I was thinking of ways to keep these cards without making it look like some clutter in the house. And one way I found was to cover old files with these cards in a creative manner. The color coordination should be proper. Except for the cards you will need glue and scissors... that's all.

File before the work started

Cards Used --- Aren't they lovely?

Both front and back side

Behind

Front side


Subscribe to:
Comments (Atom)
 Tweet this